TOR is basically an internet networking tool that allows its users to enjoy the opportunity of safe Internet browsing. It hides your online identity in a way that:
Prevents others from tracking what activities or sites you visit online,
Also, it prevents sites from knowing your physical location.
Tor is useful for anyone who wants to keep their internet activities private. Also, with the help of this tool, you can access any website you want without any difficulty. The users can access dark web content easily by using the Tor browser. It is considered to be one of the easiest ways to browse the web anonymously.
TOR does not give a complete guarantee of anonymity because it also has several limitations. However, it is the best possible solution we have currently. But, there are different ways by which you can increase your chances of anonymity like:
Use VPN with Tor
VPN (Virtual Private Network) is a tool used to increase your privacy over the web. It hides your IP address thus no third party can track you. Thus, it is a very good solution to increase your anonymity if you use Tor with VPN. In this case, VPN will act as an additional shield from outside parties to trace your identity in any way.
Use software specifically configured for Tor
Tor does not protect all internet traffic at all. It only protects the applications that are properly configured to send their Internet traffic through Tor. In other words, for web browsing:
Don’t Torrent over Tor
Torrent is basically used for peer-to-peer sharing or downloading large files like movies, shows, etc. Torrent file-sharing applications have been observed to ignore proxy settings and make direct connections even when they are told to use Tor. Thus, it is better not to perform Torrent file-sharing as it is risky and can make your IP address visible.
Use HTTPS version of websites
The websites you visit matters a lot. There are many websites present online but all of them are not end-to-end encrypted. As Tor is basically used for anonymity purposes, thus the users are advised to perform their online activities wisely. So when visiting any website, make sure that includes http:// in their URL because they are considered to be the safest and encrypted sites available.
Yes, you can use VPN with Tor. VPN is a powerful tool that allows you to perform multiple activities like access to restricted sites and hides your IP address so no one can track you. Thus using them together will provide you with an extra layer of security over the web.
Tor over VPN
One of the methods to use Tor and VPN is “Tor over VPN”– also called “Onion over VPN”. With this method, the user connects to a VPN first and later accesses the Tor network through it.
VPN over Tor
The second method that can be used in combining these privacy tools is using a “VPN over Tor” – also called “VPN over Onion”. Tor network is connected first and then a VPN.
TOR browser conceals your online identity better than other browsers. It hides your IP address that will make others track your activities performed online. Thus, your requests placed online are passed through different processes to make this happen.
Your traffic is bouncing through volunteers’ computers in different parts of the world is a time-consuming task. It is believed that while using TOR, your query is processed through three TOR network relays called nodes to ensure that your identity is hidden in the best possible way. These are some of the reasons for slow speed for Tor browsers.
JavaScript (JS) is a programming language in order to make web pages interactive. It is used for both: client-side and server-side. JS improves users’ experience by converting web pages from static to interactive ones. It adds automation and animation to the web pages and enhances the experience of users while visiting pages over the web.
As it is believed that if you have enabled Javascript while using TOR, it opens a back door for the hacker to track your IP address. If you have enabled Javascript, the hackers/attackers can access the webpage you are using and from there they can even track your IP address too. And as TOR browsers are based on providing anonymity and privacy completely, hence it is advisable to disable it while using TOR.
How to Disable JavaScript?
To be on the much safe side, it is better if you disable JS while using TOR.
The method to do this is not complex at all.
Following are the steps you need to follow:
- Open the Tor Browser.
- Tap on the Menu icon.
- Tap on settings.
- Turn off Javascript from there, simply you will see the “Safest” option available.
If you are unable to connect to the Tor, you can try these troubleshooting steps:
- Clear all the app, relaunch Tor Browser.
- Or connect bridges, if Tor is banned in your Country.
If the issue persists please contact us.
- Open Tor Browser.
- Tap on the Tor Icon at the bottom center of the screen.
- You will get Pop up of Tor settings, Tap on location.
- On the locations list, select your preferred location.
- You are connected to the new Tor Location.
If you are unable to connect to the VPN, you can try these troubleshooting steps:
- Try connecting to a different VPN server
- Quit the app, relaunch it and try connecting again
- Turn off Wi-Fi, then turn it back on and try connecting again
If the issue persists please contact us.
You can choose from a list of various VPN servers on the Stark VPN premium version. Follow these steps:
- Tap on Free VPN or tap on the VPN country you are currently connected to
- Choose your preferred VPN server from the list
- Wait for a few seconds
- You are connected!
Connecting to the VPN is easy. Follow these steps:
- Open Tor Browser VPN
- Tap on the round connect button on the center of the screen
- If you get a popup to allow VPN configurations on your device, tap “Allow”
- Wait for a few seconds
- You are connected!
You can purchase a premium subscription to unlock more features and benefits like faster connection, more VPN servers, unlimited bandwidth, Unlimited Tor locations, and no ads. Follow these steps:
- Tap on “Upgrade To Pro” in the settings.
- Tap to select Weekly, Monthly, or Yearly subscription
- Tap on “Start Subscription”
- Confirm your purchase
- Your app will be upgraded
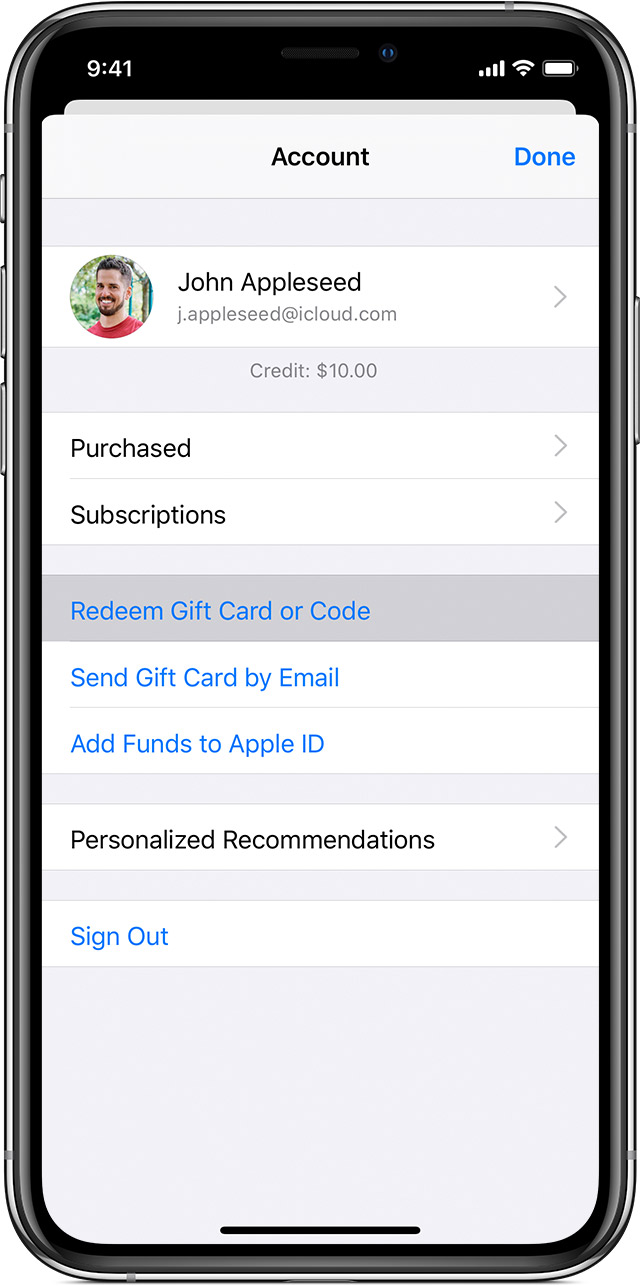
Redeem a gift card or code on your iPhone, iPad, iPod touch
- Open the App Store app.
- At the bottom of the screen, tap Today.
- At the top of the screen, tap the sign-in button
 or your photo.
 - Tap “Redeem Gift Card or Code.” If you don’t see “Redeem Gift Card or Code,” sign in with your Apple ID. Learn what to do if you forgot your Apple ID.
- Tap “Use Camera” and follow the instructions on the screen. If you have an older card or you’re in certain countries or regions, you might not be able to redeem a card with your camera. Tap “You can also enter your code manually,” then follow the instructions on the screen.
- If you have an App Store & iTunes Gift Card, enter the 16-digit code, which starts with X, from the back of the card.
- If you have a promo or content code, enter the code from the back of the card.
- Tap Done.
If you a premium user but you are somehow unable to access Pro features, you can restore your purchase from the app. Just follow the steps below.
- Go to Settings
- Tap on “Upgrade to Pro”
- On the next screen, scroll down and tap “Restore”
- After successfully restoring your purchase, you will be able to use Pro features again.
- Go to reportaproblem.apple.com.
- Sign in with your Apple ID and password.
- If you see the “Report” or “Report a Problem” button next to the item that you want to request a refund for, click it.
- Follow the instructions on the page to choose the reason why you want a refund and submit your request.
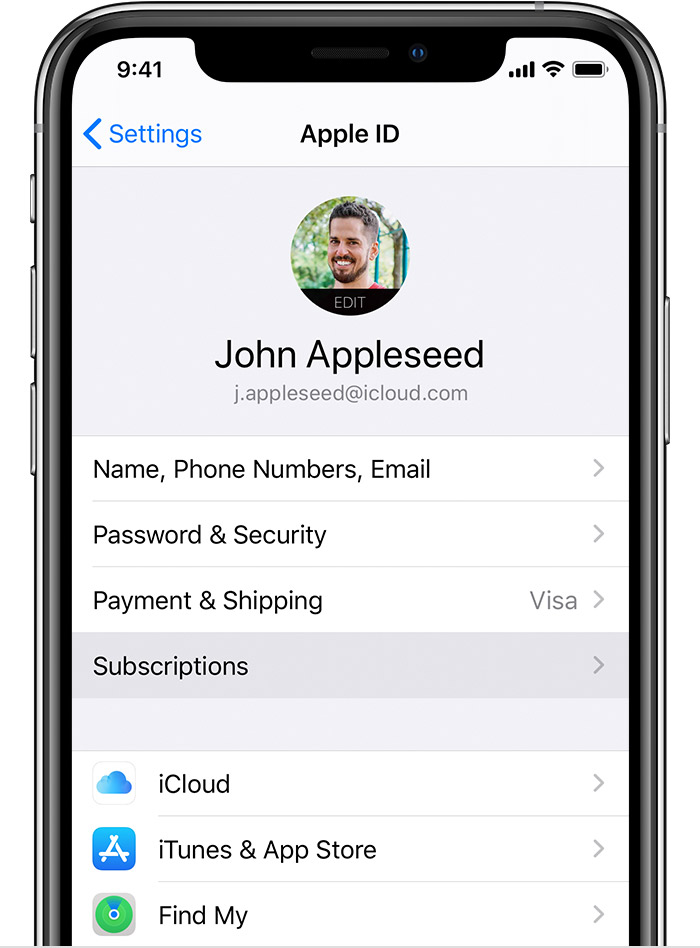
How to see or cancel subscriptions on your iPhone, iPad, or iPod touch
- Open the Settings app.
- Tap your name.
- Tap Subscriptions. (If you don’t see “Subscriptions,” tap “iTunes & App Store” instead. Then tap your Apple ID, tap View Apple ID, sign in, scroll down to Subscriptions, and tap Subscriptions.)
- Tap the subscription that you want to manage. Don’t see the subscription that you’re looking for?
- Tap Cancel Subscription.If you don’t see Cancel Subscription, the subscription is already canceled and won’t renew.